
We have had a number of people ask how to install this product themselves, which is exactly why we created a full walkthrough install guide complete with pictures in the description of the product page itself, as well as a full walkthrough video version. If you are a visual person we highly recommend our video tutorial, which can be found here. If you specifically want something to reference, continue with the following below.
To start you’re going to want to have a couple tools at your disposal. Such as a new sharp blade, a dull blade will give you a jagged cut when it comes to vinyl and will more than likely ruin the look of your finished product, so just make sure you have a nice new blade to work with. Next will be a squeegee with a felt edge, gloss black vinyl can be scratched fairly easily when only using a hard edge squeegee on edges and round areas that need to be conformed, so make sure to use the right one. Next major tool you will absolutely need for this install is a heat gun, typically most jobs can be done with a hair dryer alternative, but we really recommend having a heat gun for this one as the heat required to give the vinyl the stretch and conformability it needs is much higher than most hair dryers output is capable of. These tools are the major pieces of the tool kit required for the install. Last but not least, having a partner can help you quite a bit during the install process while heating certain areas. It has been done with only one person, but it is far easier with two, so grab a friend, you only need them for a minute or two.
Like any wrap project, the prep is the most important part. For best results we recommend cleaning the surface that you'll be applying our overlays too until it looks like new. Cleaning should consist of removal of any waxes, dirt and or debris. For the cleaning process a clay bar is highly recommended: CLEANING PREP SPRAY & CLAY BAR's SOLD HERE). Before you begin installation of any vinyl overlays please make sure you are working in the right conditions, you should never install vinyl in direct sunlight, never apply vinyl in temperatures that are neither too hot nor too cold. Our in-house expert installers say the optimum temperature for installing vinyl is between 65 and 72 degrees (F). Vinyl can be installed in temperatures as low as 65 degrees (F), and up to 90 degrees (F). Vinyl has a more difficult time conforming and staying in place in colder temperatures though, which is why we recommend waiting until temperatures warm up or install in a temperature controlled environment.
After the surface has been prepped and cleaned you can start the install. It is important to note that this is a dry install, not a wet install. When it comes to wrap vinyl you do not spray anything on the surface you are installing. This is a common misconception when many of our installs deal with tint film, which is very different from wrap film, and requires a wet install because of the way the tint material is actually made. So if you’ve already sprayed something on the light right as your about to lay the overlay, make sure to wipe it off. You want a clean and dry surface for this material.
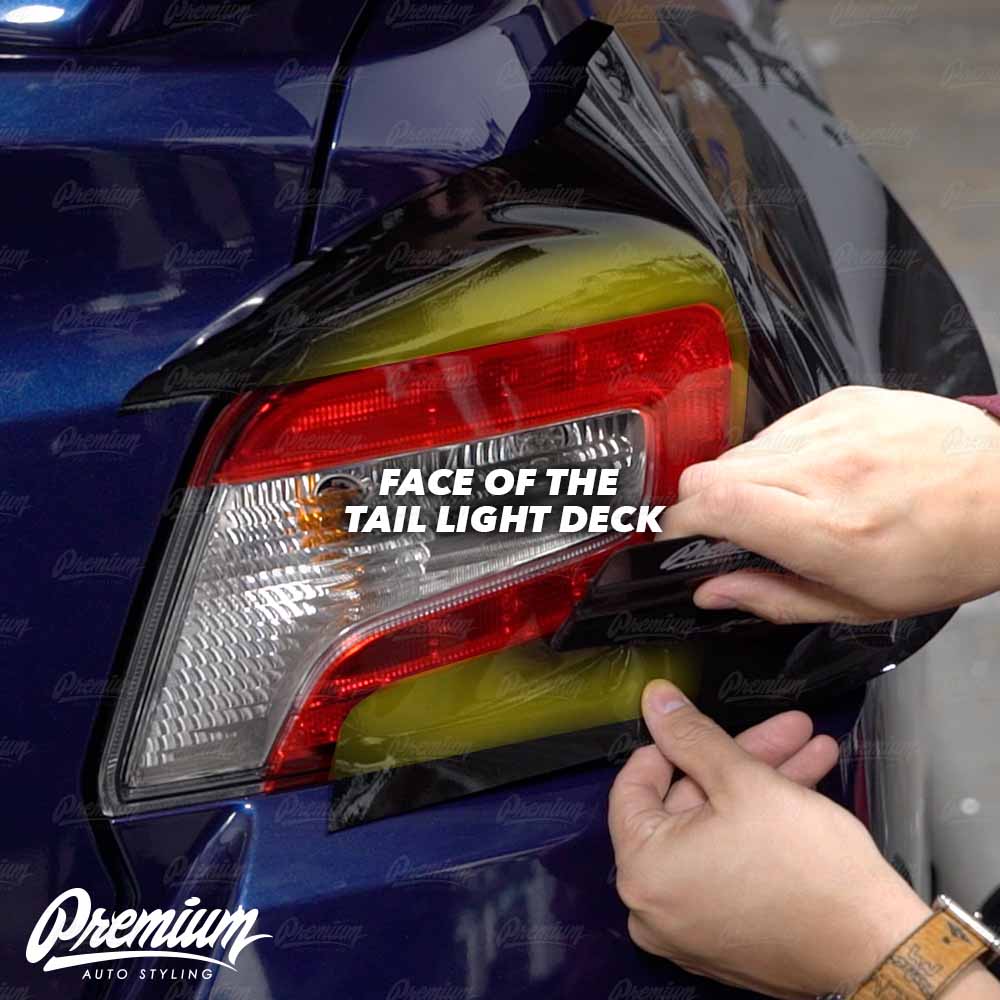
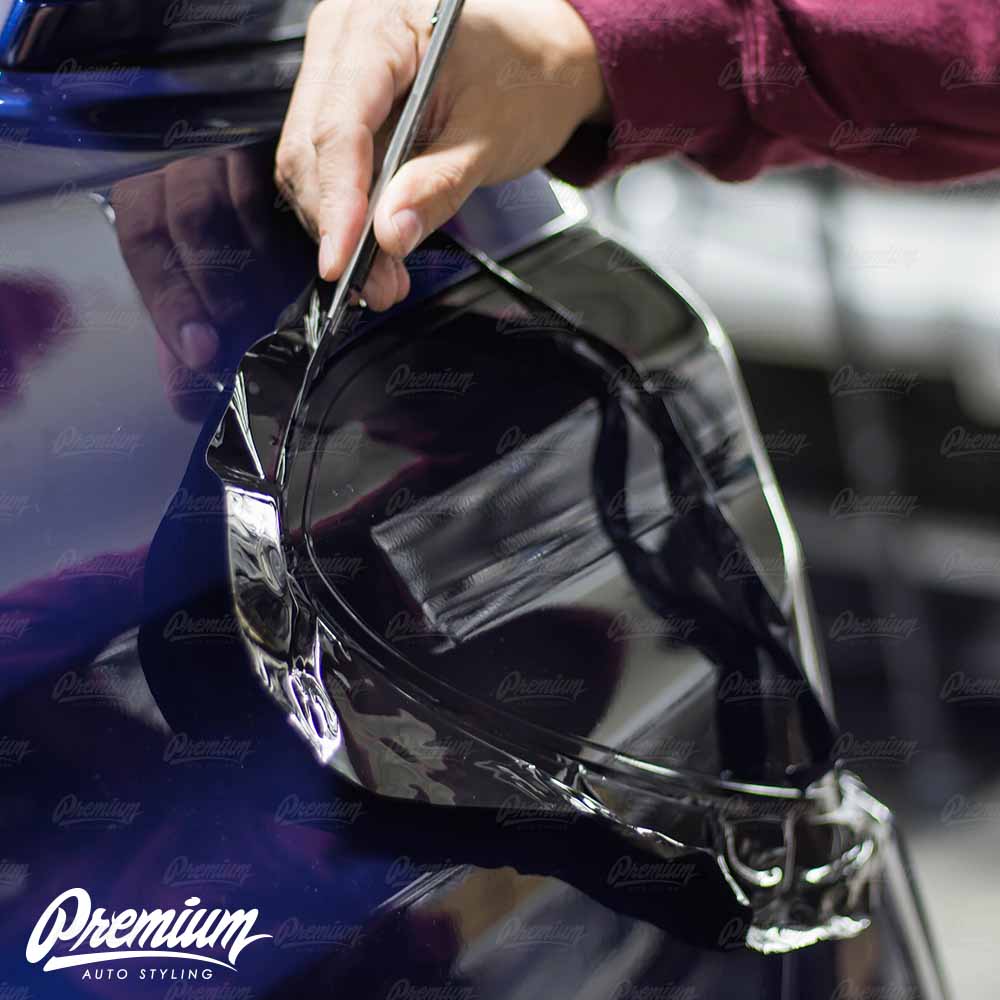
Starting with the tail light deck (the larger of the two pieces you receive for this product), place the front facing portion of the overlay(the part that has a cut out for your lights). You will notice there is excess on the outer edges, focus on the inner edge that outlines the part of the tail light that illuminates. While aligning this portion of the overlay be careful not to stretch or warp the lines, the product has been pre-cut to perfectly form around the light by simply laying it onto the light.

Once alignment has been confirmed, use a squeegee to lay this portion of the overlay that covers the face of the tail light, stop before you get to the side of the tail light.
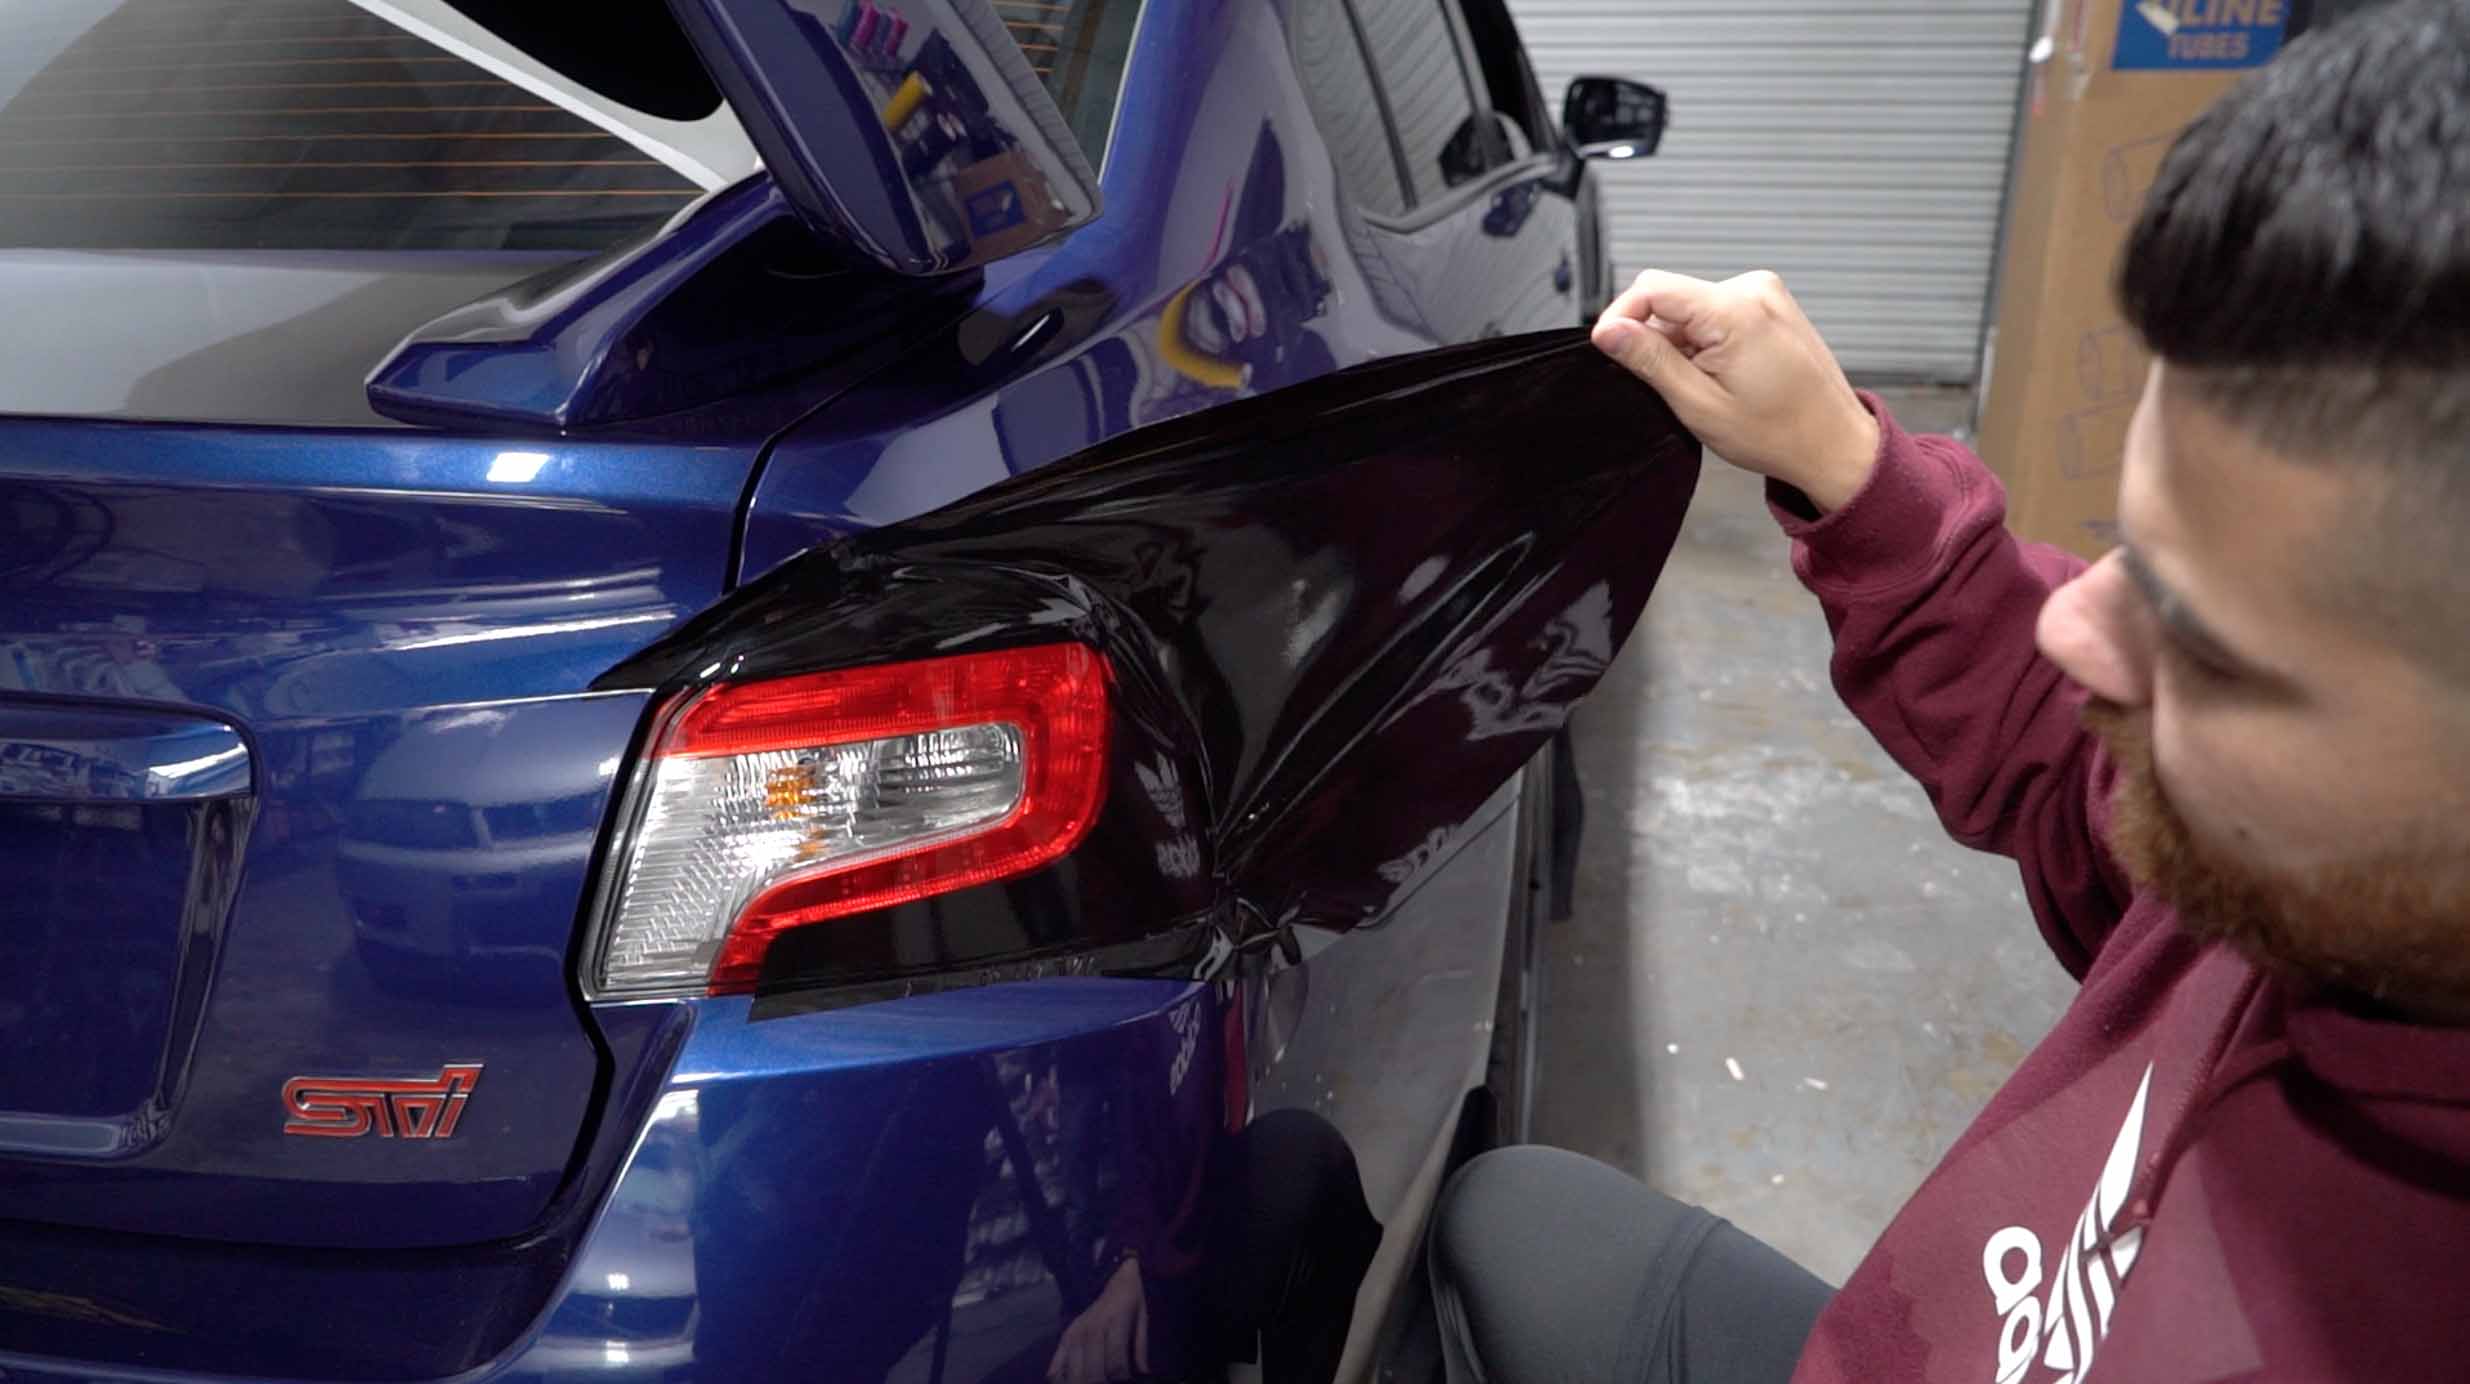
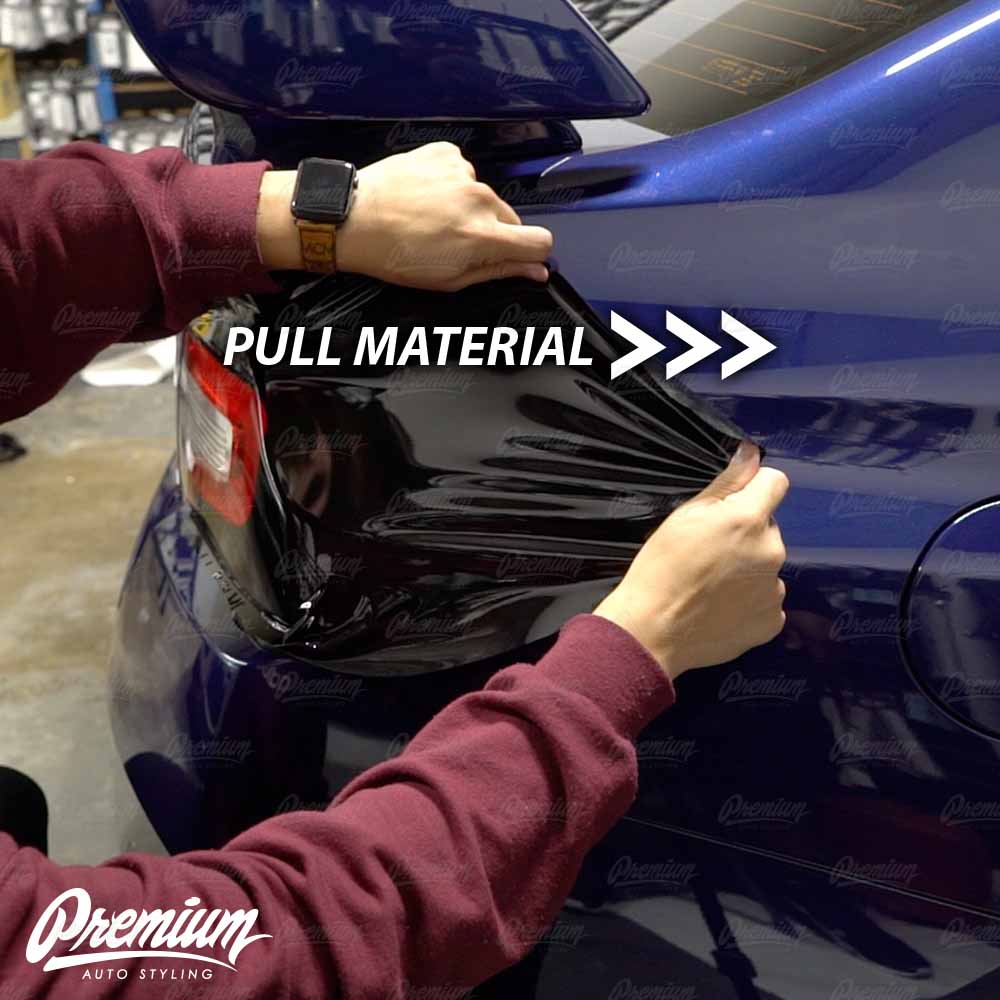
Now you will focus on the side of the tail light. This is where it is helpful to have a second set of hands to help you. While holding the side portion of the overlay away from the tail light, briefly heat the area with a heat gun until it is pliable. Heating the material should not last longer than 5 seconds. Be careful not to over heat the vinyl. If you over heat the material you risk burning or over stretching it during the next step.
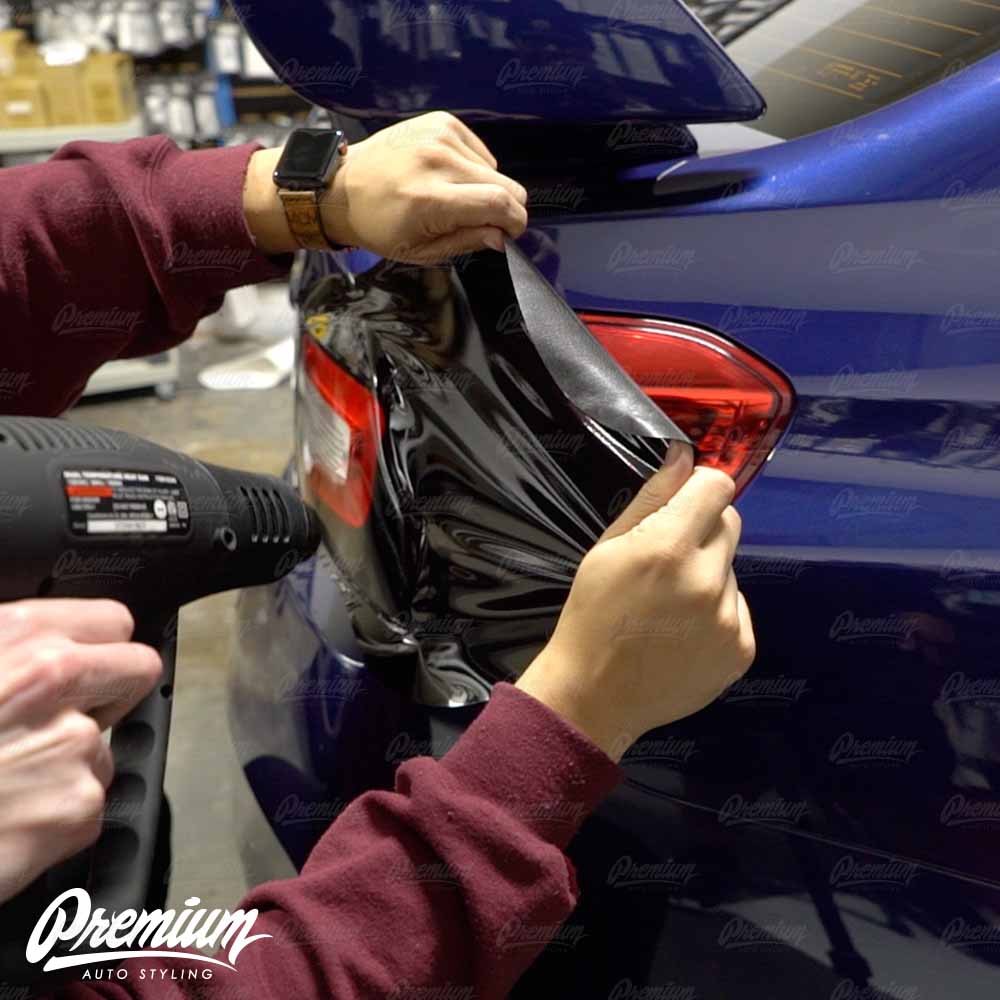
After briefly heating the material, grab the far edge of the vinyl and give it a slight pull and stretch as you lay it onto the side of the tail light. Take note of the hand positioning pictured below. Your objective is to lay the material with the least amount of wrinkles as possible. Just enough heat and just enough pull is what will make this portion do-able.
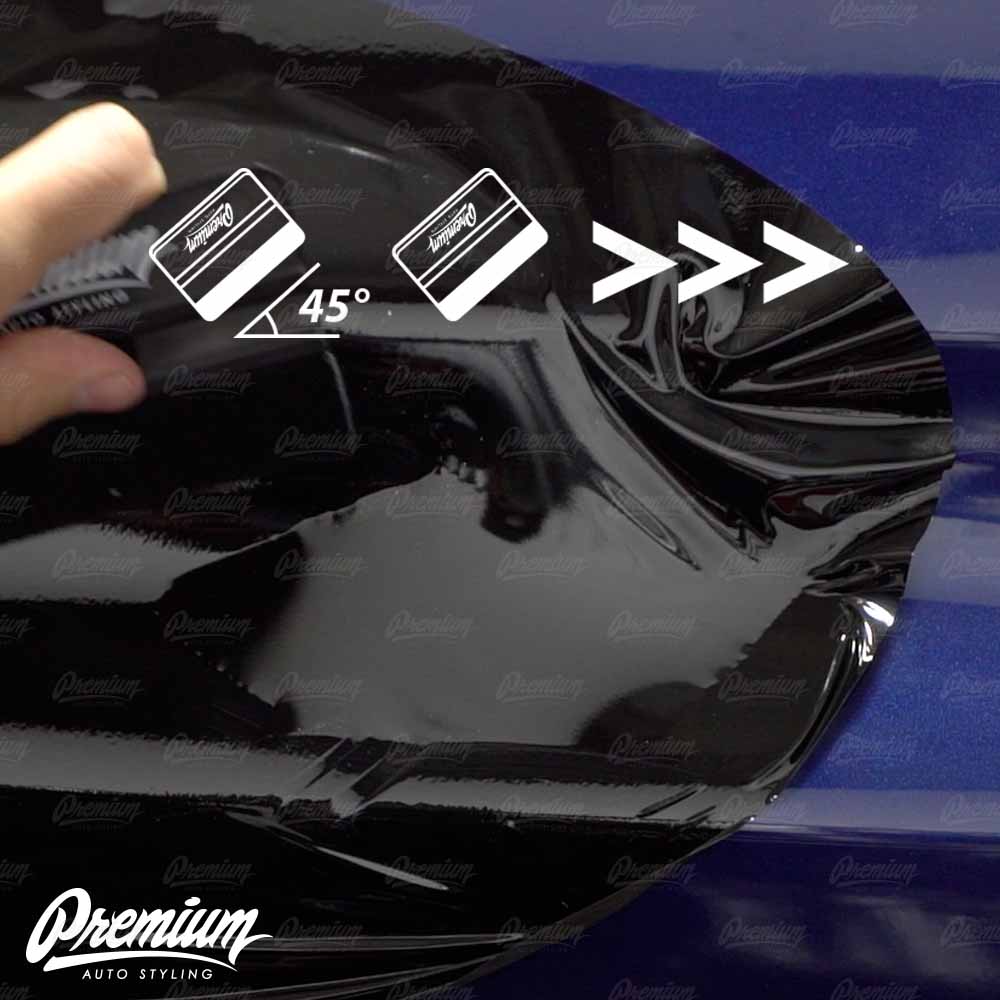
You now have the side of the tail light glassed, start by squeegeeing the middle horizontal recess in the side of the tail light. Using a 45° approach angle with the squeegee, start from the rear side, apply pressure with the squeegee and push the air out towards the front of the vehicle.
Now squeegee the rest of the material that is left on the side of the tail light, always moving from the center outward towards the edges of the tail light, and apply heat when needed to help conform or relieve wrinkles.
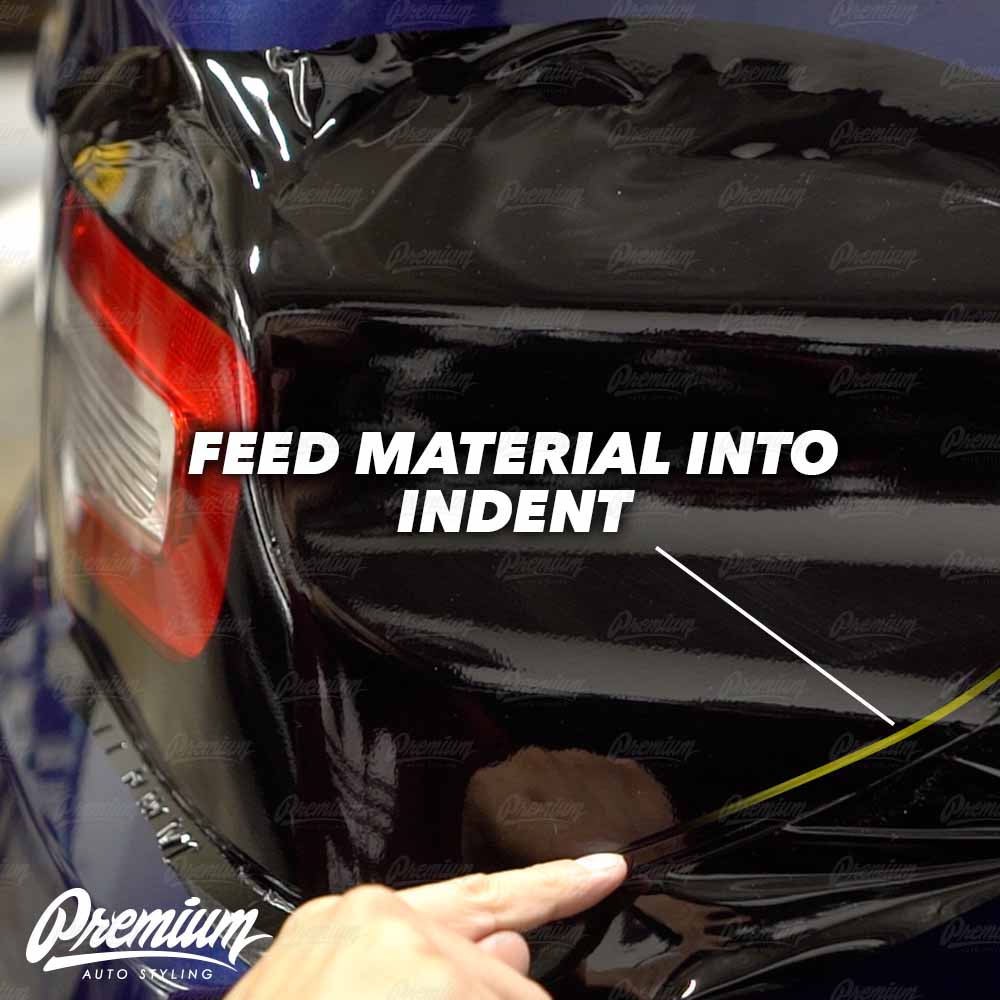
Once you reach the indent along the outer edge of the tail light, lift the edge of your vinyl up to that point, and feed the vinyl into the indent. If you do not do this you will just be left with bridged material across this indent, which may leave you with an undesired finish.
Now you can continue to the outermost edge of the tail light making sure everything is squeegee'd down without any wrinkles.
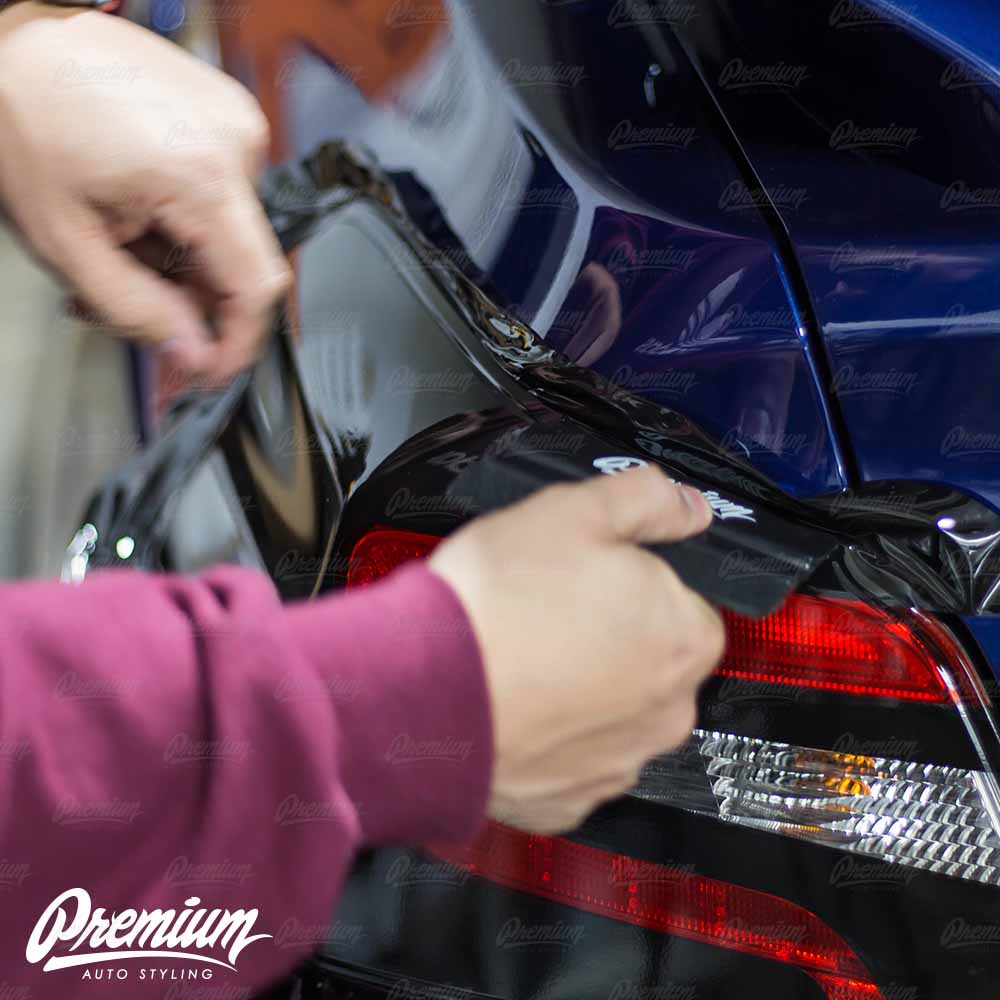
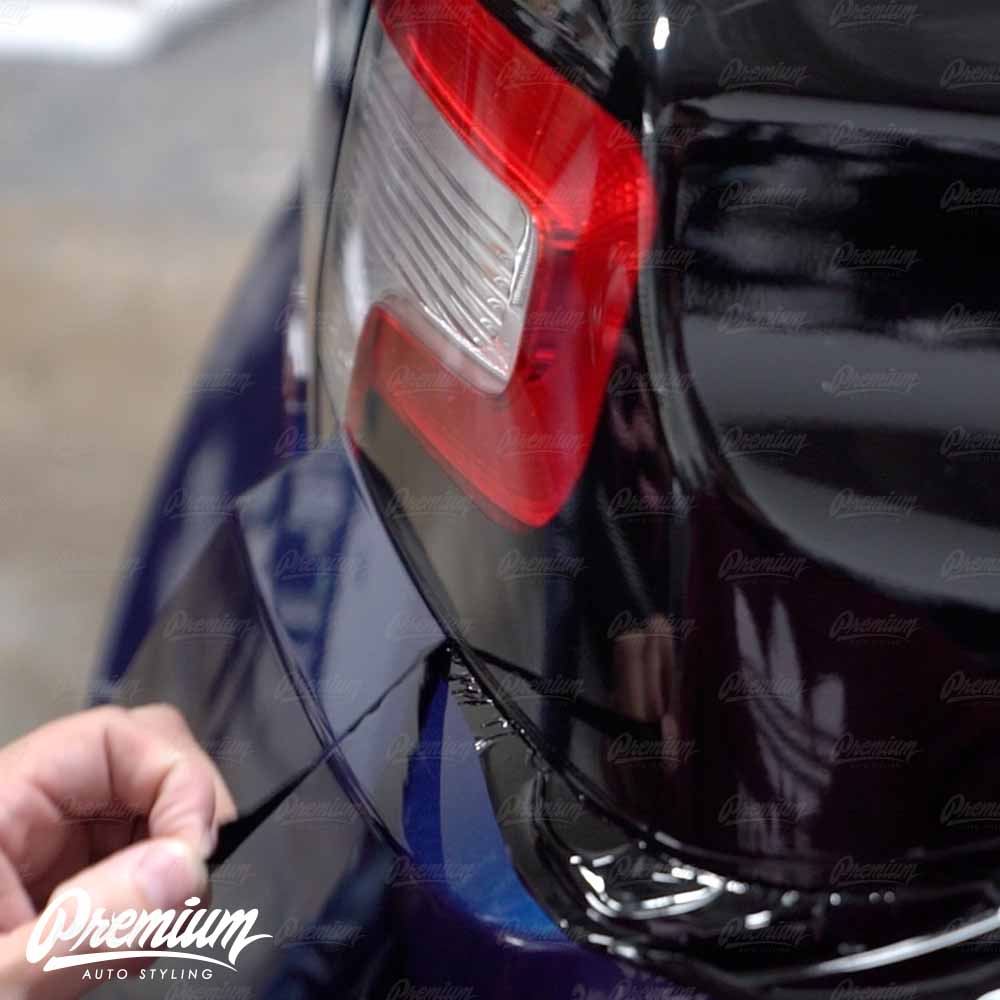
Using a new sharp blade, trim the excess material around the tail light. We recommend only cutting in the negative space between the tail light and the body of the vehicle. This insures a clean finish.
After removing the excess material, heat the entire overlay one last time, known as post heating, and use a squeegee to tuck along the edges of the tail light.
Now that the hard part is done, all that's left is the easy part. With the transfer tape attached, take your tail light insert and line up the overlay with the tail light's outer edge that faces towards the trunk.
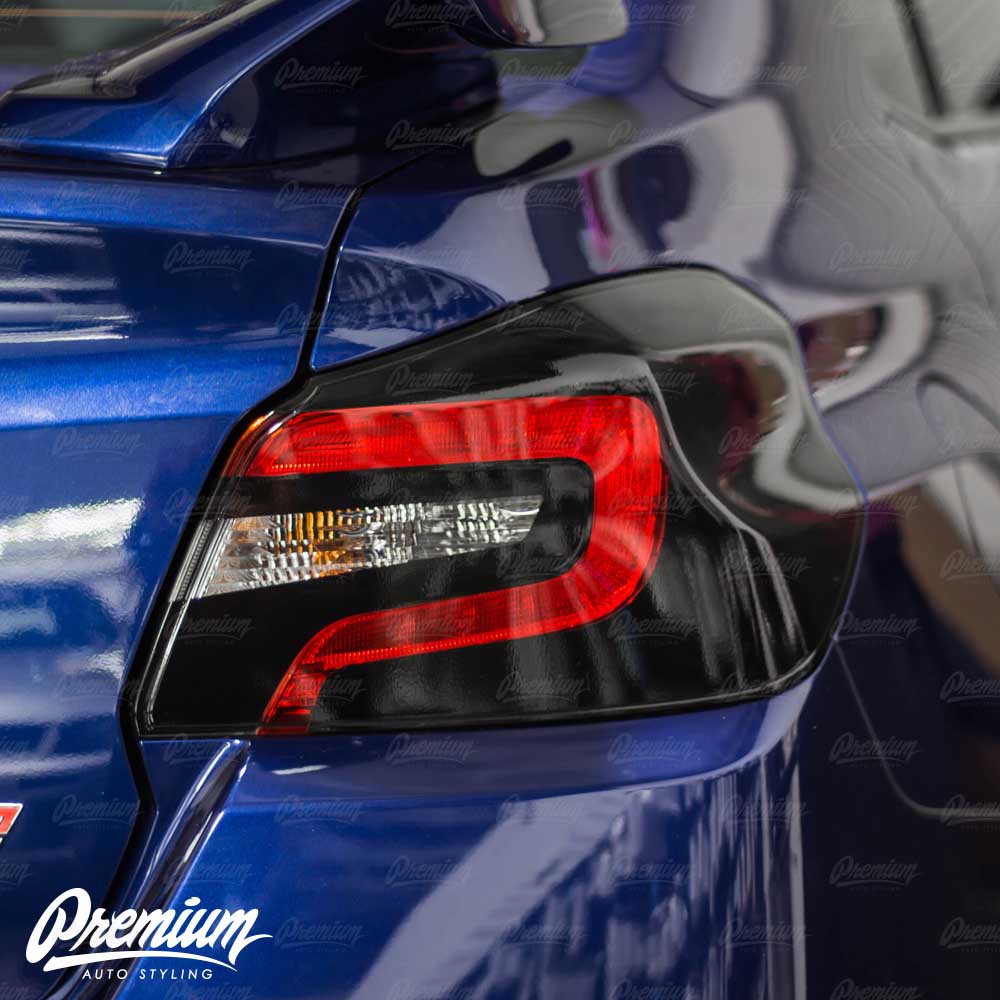
Once aligned the rest of the overlay will fall into place. Squeegee the material down. Remove the transfer tape. Post heat the product, and the installation is complete.
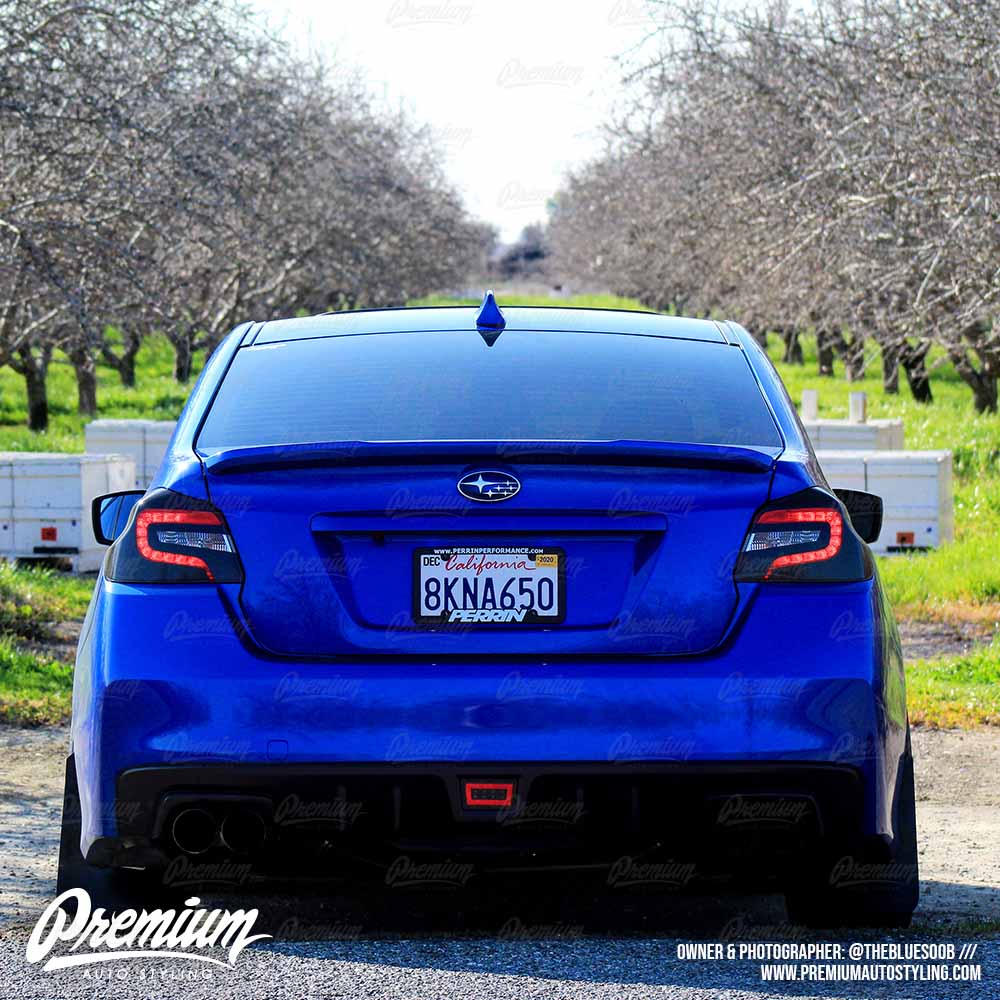
That's it, there is quite a few steps but its absolutely do-able for DIYers. If it wasn't we wouldn't have created it. It ranks as a 3 out of 5 on our difficulty chart which is less than doing a full tail light tint. Wrap material is far more forgiving than a wet install tint material so if you've dealt with tint, we are confident this will be easier for you. Don't get us wrong though, this install does take patience and a little bit of know how, but it can definitely be done at home in your garage with a friend.
Want this product: Tail Light Black Out With Custom Insert Cut Out Overlay - Gloss Black | 2015-2020 Subaru WRX/STI
FOLLOW US ON INSTAGRAM TO STAY UP TO DATE WHEN NEW PRODUCTS ARE RELEASED:
